Data Access
Choose which tables and columns Better Analyst can query in your SQL databases, filter which rows people get answers from, and show each team member only their own rows, tables, and columns.
Data Access controls what Better Analyst can query in a connected database, and on team data sources, what each person can get answers about.
To show each team member only their own data, follow Set up per-member data access.
Data Access is available for SQL data sources: BigQuery, Snowflake, Supabase, MySQL, PostgreSQL, and MSSQL.
How it works
Every answer about your database comes from SQL that the AI writes and runs. Data Access changes what that SQL is allowed to touch, before it runs. The AI can't get around it, because the rows and columns it isn't allowed to use never come back from the database.
There are three controls, from broadest to narrowest:
| Control | What it limits | Who it applies to |
|---|---|---|
| Tables and columns | Which tables and columns can be queried at all | Everyone |
| Who can see this | Which tables and columns each person can query | Team members, by their attributes |
| Row filters | Which rows come back | Everyone, or each person by their attributes |
For example, on a sales database you might share six tables with the AI, keep fx_rates and shipments.cost for Finance, and show each sales rep only their own region's rows. Here's the same question asked by two reps on that database:
Open Data Access
Open the Data access page for a data source in any of these ways:
- In Library, open the Connectors tab, click the settings icon on the data source, and choose Data Controls.
- In a chat, open Add / manage data, click the settings icon on the data source, and choose Data Controls.
- Right after you connect a SQL data source, choose Manage Data Access on the success screen.
Choose how much the AI can see
The first time you open Data Access for a source, choose one:
- Everything: the AI can query every table and column. Quickest to set up, for databases with nothing sensitive in them.
- Only what I choose: pick the tables and columns, and optionally filter rows. Recommended for production data. Answers also get faster and more accurate when the AI has fewer tables to choose from.
Once a source has restrictions, Data Access opens straight to them. Click Access options to go back to this choice.
Tables and columns
Tick the tables the AI can use. Expand a table with the arrow on the right to choose its columns. A table with only some columns ticked shows a dash in its checkbox.
- Search filters by table or column name.
- Select all and Clear tick or untick every table.
- Refresh schema picks up tables and columns added to the database since you last looked. Your existing choices are kept.
Use columns to leave out things like email addresses, salaries, or API keys. A table or column you don't tick is invisible to the AI and to everyone on the team.
Start with the fewest tables you need and add more later. It's easier to share more than to take back something that was shared.
Row filters
Row filters limit which rows people can get answers from. Each filter is added to every query the AI runs on this data source, so rows that don't match never come back.
A filter compares a column with a value. Under Compare with, choose where that value comes from:
| Compare with | Example | Who it affects |
|---|---|---|
| Fixed value | orders.status is active | Everyone, including owners and admins. Use it to leave out test rows or old data. |
| Member's attribute, such as Member's Region | sales_orders.region is one of each person's own Region | Each team member gets their own rows. See Per-member rules. |
| Embed viewer's ID | orders.customer_id is the ID in the signed embed token your app sends | Each visitor of an embed gets their own rows in chat |
There are two ways to add filters. You can use both; a row then has to pass both.
Filter specific tables
Add conditions one table at a time.
- Tick at least one table under Tables and columns.
- Turn on Filter specific tables. The first rule appears.
- Choose the Table, then the Column. The list shows every table, but you can only pick ones you've ticked.
- Choose Compare with, then the Condition: is, is not, is greater than, is less than, contains, or is one of.
- For a fixed value, type the Value. For is one of, separate values with commas, like
West, East. - Click Add rule for another condition. A row has to match every rule on its table.
Examples
| Table | Column | Condition | Value | Result |
|---|---|---|---|---|
orders | status | is | active | Only active orders, for everyone |
products | price | is greater than | 0 | Only products with a price |
regions | country | is one of | US, CA, MX | Only North American rows |
sales_orders | region | is one of | Member's Region | Each person's own regions |
Filter every table by the same ID
This is a shortcut for databases where every table carries the same kind of ID, such as a customer, client, or organization ID. Instead of writing one rule per table, you pick that column in each table once and set one condition for all of them.
The column can have a different name in each table. For example, orders.org_id, invoices.organization_id, and users.orgId all hold the organization, so you'd pick all three and set the condition once.
- Turn on Filter every table by the same ID.
- Click the ID column in each table. Selected columns turn blue.
- Under Show rows where the ID…, choose Compare with, the condition, and for a fixed value, the value.
Tables where you didn't pick a column aren't filtered by it.
Per-member rules
On a team data source, a row filter or shared ID can compare with the person asking instead of a fixed value. Each person then gets only their own rows: someone whose Region is West sees West rows, and someone who covers West and East sees both. Per-member rules are included with the Team and Enterprise plans.
Only team owners and admins, and the data source's access managers, can change who sees which tables and rows.
The values come from Team settings → Members, where owners and admins add member attributes and set each person's values. The filter here only names which attribute to use. The Set up per-member access checklist at the top of the page tracks both halves, including how many members have values.
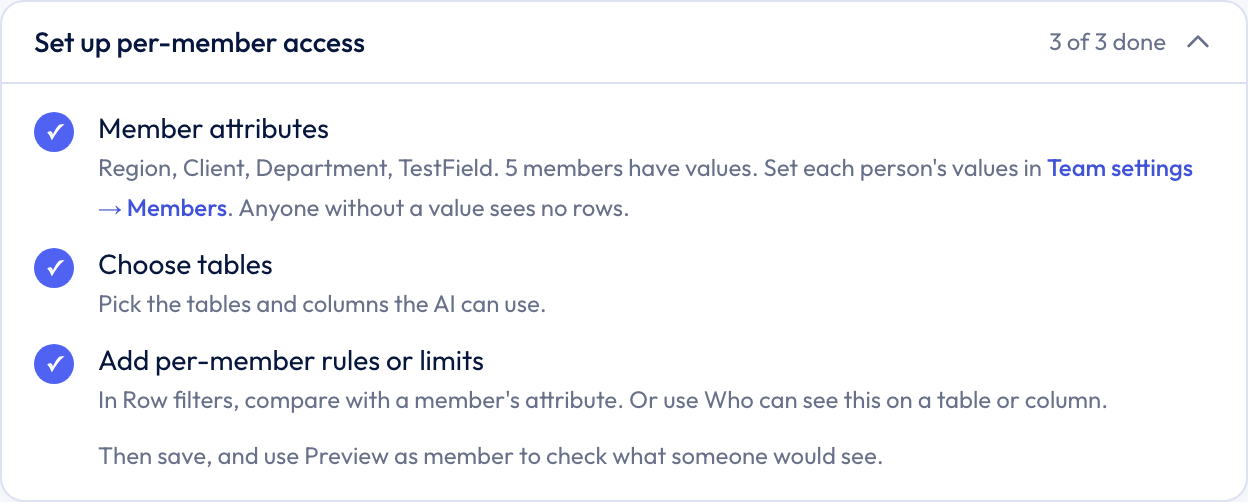
Set it up
-
In Team settings → Members, add a member attribute such as
Region, and set each member's values. -
In Data Access, add a row filter on the column that holds that value.
-
Under Compare with, choose Member's Region. There's nothing to type, and the condition is is or is one of. The note next to the filter links back to Team settings → Members.
-
In Per-member access, choose Who sees everything:
- No one (owners and admins are limited too): owners and admins get only their own rows as well.
- Owners see everything
- Owners and admins see everything
The same setting covers tables and columns limited by member. Fixed-value filters still apply to everyone. Changes to this setting are recorded in the team audit log.
-
Click Save. The first time a data source gets per-member rules, a confirmation lists what uses the source and what changes before anything is saved.
A data source can't mix per-member rules with embed viewer rules.
Views and copies of a protected table
A per-member filter applies to the table it's set on. If the data source also allows a view that reads that table, a query on the view is refused rather than returning everyone's rows. Add a filter for the view's own column, or leave the view out and use the table.
A separate table holding a copy of the same rows isn't linked to the original, so its filter doesn't carry over. Give the copy its own per-member filter, or leave it out of the tables you tick.
Preview as member
In Per-member access, pick a team member under Preview as member. You'll see the filters they get from the saved settings, such as sales_orders: region is West, and any tables or columns hidden from them. If they'd see nothing, it says which attribute is missing.
The preview runs no query, and shows saved settings, so save first to preview a change. Each preview is recorded in the audit log with the member's name, never their values.
View as a member
Owners and Admins who already see everything on the source can go further than the preview: view a per-viewer dashboard as a member, or ask a test question as them in chat. See View as a member.
What changes for a per-member data source
When you turn on per-member rules, each person gets only their own rows from this data source. Because the rows depend on who's asking, anything that shows results to more than one person, or runs without a person, changes:
- Dashboards: newer dashboards show each viewer their own numbers, and their public links and schedules turn off. Older dashboards stop showing data until they're rebuilt.
- Scheduled tasks and Data Flows that use the data source pause.
- Chats: a team chat that used the source becomes a private chat for the person who started it. Anyone else starts a new chat.
- Slack can't query it.
Turning the rules off later doesn't bring public links or schedules back; turn them on again yourself.
If someone's attribute is empty, they get no rows. Nothing is ever shown unfiltered.
Limit tables and columns by member
On a team data source, you can hide a table or column from everyone except the members who need it. For example, keep salaries for members whose Department is HR, or shipments.cost for Finance. Everyone else still sees the rest of the tables and columns you ticked. Limits are included with the Team and Enterprise plans.
- In Team settings → Members, add a member attribute such as
Department, and set each member's values. - Next to a ticked table, or a column (expand the table), click Who can see this.
- Choose Only members whose, pick the attribute, and type each value that may see it. Press Enter after each one.
- Click Done. The table or column shows a Limited badge, and a table shows how many of its columns are limited.
- Choose Who sees everything in Per-member access, then click Save.
Limit the columns that can be worked out from a hidden one, too. If profit is limited, margin (or sales minus cost) can reveal it, so give those the same limit.
A limit only ever hides; it never shows a table or column you didn't tick. For people outside a limit, it's hidden everywhere: in chat, in the schema the AI sees, and on dashboards. They can't query it, and the AI isn't told it exists.
Someone with any table or column hidden from them also doesn't get this source's published Data Context, Knowledge Base documents, or SQL feedback, since those can name what's hidden.
Unticking a table or column removes its limit. Choosing Everything removes all limits, since a limit needs chosen tables. A data source can't mix these limits with embed viewer rules.
On dashboards, a chart built on a table or column hidden from the viewer shows a no-access card instead of its data; the rest of the dashboard still loads.
Access managers
Owners and admins can name team members who manage one data source's access without being team admins, such as a data lead who knows which tables each group needs.
- On the Data Access page, find Who can manage access.
- Choose a team member and click Add.
Access managers can choose tables and columns, add row filters, limit tables and columns, and use Preview as member. They can't change Who sees everything, choose access managers, or edit member attributes. Changes to access managers, and the managers' own changes, are recorded in the team audit log. See Roles & permissions for who can do what.
Saving
The save bar at the bottom of the page sums up what you've chosen, like 6 of 6 tables shared · 2 table rules, and stays in reach while you scroll. Click Save. Settings apply to new queries straight away.
You need at least one table ticked to save. To let the AI use everything, go back to Access options and choose Everything.
Troubleshooting
Tables aren't appearing
- Check the connection's database user can
SELECTfrom them. - Click Refresh schema.
A rule's table can't be picked
The table isn't ticked under Tables and columns. Tick it first. A rule on a table you later untick shows a warning and has no effect.
A table or column is missing for someone
- Look for a Limited badge on it.
- Use Preview as member to see what's hidden from that person.
- Check their attributes in Team settings → Members.
Someone gets no data
- Check fixed-value filters aren't too narrow, and that values match the data exactly, including capitals.
- For per-member rules, use Preview as member. It names any missing attribute.
Next steps
- Set up per-member data access step by step
- Member attributes
- Set up a Knowledge Base to give the AI more context
- Connect a database